You and your friends are outdoors camping, or you are having fun in a pool and you want a drink, but no one wants to step out of the water to get drinks for everyone. It is possible to create an Ice chest float with some common DIY items around you.
The items you will need for creating your own ice chest float are; Your pool noodles, Ice, Tape measure or ruler, and a Serrated Knife and of course your drinks. You don’t have to create a cooler if you can invest a little in a camping cooler. The best cooler is will not only keep your drinks cool and fresh, it floats easily by holding the load of drinks in place, hence you can pass or push it around.
If you have to build your own cooler, it will take a lot of time, and you need to construct it in such a way that it doesn’t break or sink under the weight of your drinks. The ready-made cooler for camping is therefore your most convenient option.
Creating Your Ice Chest Float
Step #1
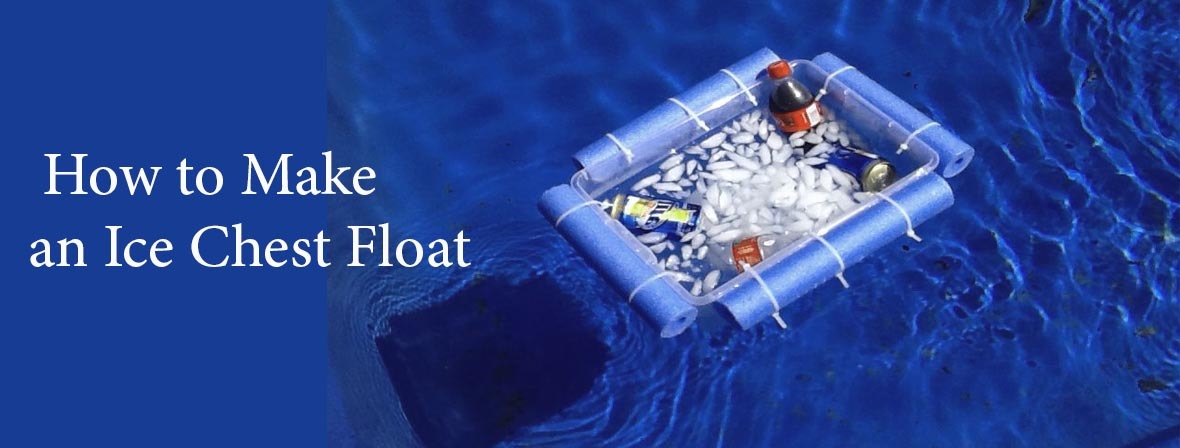
The first step to take is to get a cheap mid-size plastic container or Tupperware that comes with a lid. Your under-the-bed sweater box is one of the ideal options to consider.
You need to get a pool foam noodle – the size should depend on the size of your cooler box.
You will also need a pack of water-proof nylon rope. Make sure you inspect the container for dents, holes and scratches that may allow water to penetrate.

If you can’t seal such holes, then you need to replace the container or Tupperware immediately.
You should consider cleaning the container with a damp cloth before you move to the next step.
It is also suggested that you choose a container with handles to facilitate the movement of the entire pack from one place to the other.
The handles are particularly needed when moving the ice floater out of the water .
Step #2
The second step you must take is to align your box, next to the noodle. Cut the box into 4 pieces, 2 of these should be longer and the remaining too must be shorter. Make sure you measure the pieces to ensure that they will fully accommodate your floating cooler within.

Make use of a serrated knife to cut the noodles at angle 45 degrees. Make sure you slice the length of the poodle along the bottom just like you are cutting a hot dog bun.
Step #3
Take the nylon rope, and simply loop it through the four pieces already cut, to form a rectangular frame.

Make sure you leave a long line with a finger-loop on any of the corners. Make sure the corners line up as you slide the rope through the noodles.
Continue working the rope until all four pieces have been slipped together to form a rectangular base to hold your floating ice cooler.
Make sure you don’t tighten the rope around the loop too much to prevent breakage. Make sure the rope is tight enough to hold the pool noodles together.
Step #4
The last step is to place the box inside the frame and the ice chest float is completed.

Do not force the box inside, if the space is too tight, the rope can break and the noodles will fall off. You may want to restart all over again by cutting longer noodles that will fit the box perfectly.
Step #5
Now that you have your cooler prepared, simply fill the new cooler with your ice, and your drinks.

Take note of the extra rope on one corner, it is the rope you have to hold unto, especially when pulling the floating cooler from one end to the other. You can also use the rope to attach the floating cooler to your fish boat.
When adding your ice and drinks, it is important to pay attention to the weight of the floating cooler.

Make sure you don’t add too much of ice and beverages into the container to prevent it from sinking. Perhaps you should add the drinks one after the other.
Other Considerations to Make
To ensure that you get the most from your Ice Chest Float, you need to ensure uniformity in the length of the pool noodles.
When the lengths of noodles on either side differ significantly, your ice floating box will not sit properly, which means the weight of the beverage bottles will not be evenly shared. Make sure you measure the length of the noodles accurately.
Secondly, if you have to pack so many drinks at the same time, then you should consider canned drinks ahead of glass bottles.
Can drinks have less weight than glass bottles, hence the weight will be properly dispersed on the ice chest float.
Make sure water doesn’t get into your ice floating container, that could add much weight to the floater and may even cause the container to sink.
Make sure the pulling rope is not too long, as a matter of fact the shorter the pulling rope, the better because you can control the drifting of the floater much easier.
Conclusion
Whether you are floating inside a pool or just drifting on top of a lazy river with your friends, or you are fishing and probably need some extra boost, a floating cooler is all you need to get yourself hydrated. For an affordable investment, you can create your own ice chest float.
As mentioned earlier, it is more suitable to purchase a ready-made cooler instead of creating one for yourself. It saves you time, money and reduce the risks of creating a sub-standard cooler that may not deliver.
For so many reasons, the already-made cooler comes with lots of benefits, it made up of durable materials that can hold more drinks than the DIY float chest.
The cooler also comes with heavy-duty handles to make it easier to carry the entire pack from one place to the other.